Thursday 26 December 2013

How to survive post-Christmas sales

Each year we spend hundreds of dollars in the lead up to Christmas, to buy our family and friends gifts; only to know that on Boxing Day everything you have just bought will be heavily reduced...

For those who are brave enough to venture out to post Christmas sales, here is a guide to survival.

  • Head to the shops early - go to bed early the night before, set your alarm clock - and absolutely no snooze button!
  • Wear comfy shoes - a lot of walking will be involved, whether this in the shopping centre or from the carpark and back. Leave the stilettos at home.
  • Clothing - wear light clothing, with all the people in the shopping centres you can get overwhelmed and overheated (at all costs you don't want to be THAT person who faints in the centre, and is shown on the news across every television station). Wear shoes that can slip off easily, when you are trying on clothes the last thing you want to do is spend time buckling and unbuckling shoes.
  • Hands-free bag - forget holding your wallet and phone, today is the day you need your hands more than ever. Use a bag that crosses over your body, and throw in a drink bottle to stay hydrated.
  • Check online the night before - late Christmas Eve all your favourite retailers advertise their sales on their websites. Check out their online shop, and make a list of the stores you want to go to (this way you won't forget any).
  • If you are driving, and you see a parking take it - even if you think you may find one closer, just stick to the first parking you see (trust me on that one).
  • If you can, avoid driving - get dropped off by a friend or family member. This will save time from the nightmare that is the carpark - especially if you don't plan to be at the shops as soon as they open.
  • Try things on - the changing rooms are there for a reason! Most stores do not exchange on sale items, so try on clothes and shoes so that you do not spend money on things that don't fit.

Today's experience:
Chadstone (Melbourne's fashion capital) opened at 7am. Now when the shops say open at 7am, they neglect to mention the queues that start at 6am.
I set my alarm clock at 6am, left the house at 6.20am, and got to the shops at 6.45am (seems everyone in Melbourne had the same idea - no sleep ins here). I wore a maxi, and my Senso-style boots with a cross-over Mimco bag to keep my hands free (to hold the abundance of clothes and hangers I accumulated).
I had done my research the night before, and took a screenshot on my iPhone of all the items that were on sale, that interested me, so that I could stay on track.
I also checked the Facebook status, and Instagram pictures of my favourite stores (eg. Kookai, White Suede, Sportsgirl) to see what kind of sales they would be having. Once I saw that Kookai had 50% off selected items, I knew this would be my first stop. This is because Kookai rarely do sales, so when there is a sale every fashionista in the state would be there (and I definitely wasn't wrong).
I had finished my shopping by 9am (incredible, right?), before I headed to a quieter strip of shops for some more bargains.
I ended up with bags and bags full of Kookai items, as well as from other stores.
What you will notice, is that as each rack empties, the staff will replenish - so you need to keep checking in with the stores. Just because you scored a bargain today, doesn't mean that there aren't new bargains to be had tomorrow (so if anyone is looking for me for the next few mornings, you know where I will be...)

My biggest tip for when you are in a store is even if you think an item is OK (don't love it, don't hate it), hold it in your hands (tight, and don't let it go...). Because as soon as you put that baby down, some other person is going to come along and snap it up...usually just as you change your mind and decide you want it.

                               
                                                Good luck and Happy Shopping!

Monday 23 December 2013

12 days of Christmas: Day 12

Today we come to a close on the '12 days of Christmas', and we are ending with a BANG!
This post is a beauty bonanza. From my favourite looks, to my favourite products, to my number one product that you must add to your list; I'm covering it all.

Eye-lash curler
Easy to use, compact, and recommended by top make-up artists such as (my fave) Chantelle Baker. Using 3 squeezes (outer, mid and inner) this super easy tool gives you the perfect curl. I prefer this curler, to the bigger eye lash curlers, as it picks up the spots that the bigger tools miss. Note: Curl the lashes prior to applying mascara.

New Generation Eyelash 'S' Curler
RRP $24

Shu Uemura
David Jones


Mascara
 

It has taken hundreds of different types of mascaras to get here, but I've finally done it. An inexpensive lash curling, volumising and lengthening mascara.

Origins - GinZing

RRP $26


Brushes that I recommend for this products:
Body Shop - Lash Comb
(RRP $14.95)


The comb (brush facing upwards) is particularly useful for detangling the bottom lashes. EyelinerForget the hype around the felt tip eye liners, it is gel liners all the way. Ensure you close the lid securely after each use to ensure the product does not dry out.


Napoleon Perdis - China Doll Gel Eyeliner (Equinox)
RRP $35


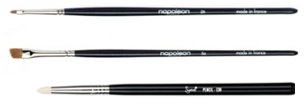
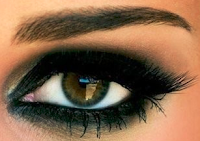
Perfect for a cat eye effect, or to rim your upper lash line to make your eyes pop. Depending on how confident you are with your gel application I have chosen 2 brushes below (smaller - for the pro's, and an angled for the beginners).

MAC Cosmetics - Eye Kohl (Feline)
RRP $32


Note: the Eye Kohl is very smudgy, and hence the third brush is perfect to use with this pencil.

Brushes that i recommend for these products:
Napoleon Perdis - 2H Fine Line Sable Brush
RRP $25
Napoleon Perdis - 5A Precision Angle Sable Brush
RRP $25
Sigma Beauty - E30 Pencil Brush
RRP $12


Setting powder 
This product is one of those ones that I absolutely cannot live without. I use this under my eyes (applying with a cue-tip) when I am using eyeliner, mascara, eyeshadows or all of the above. Your eye makeup is guaranteed not to budge when using this product.

Clinique - Blended Face Powder (03 Transparency)
RRP $50


When it comes to your face, set your foundation with this product to maximise longevity.

MAC Mineralise Skin Finish - Light

RRP $47


Brush that I recommend for this product:
Sigma Beauty - F30 Large Powder

RRP $24

Concealer 

The perfect disguise for any blemish is this concealer. Apply with your fingertips to the required areas, and like magic see those spots and redness disappear.

Lancome - Effacernes Longue Tenure
RRP $53


Primer
It's true what they say, it's a crime not to prime. And to stop you from being a fashion criminal, here is my fave primer.

Napoleon Perdis - Auto Pilot Pre-Foundation Skin Primer
RRP $59


This formula has a nice fresh smell, is quite thin (thick primers are just too heavy on the skin), and glides on easily with hand application. Ensure to prime prior to putting on your foundation, to stop the product from moving.


Foundation 
This light formula is longlasting, gives you a dewy finish, and can give you full coverage (depending on how much you build into your skin). The thing I like about this foundation (compared to MAC foundations) is that it does not sink into any of your lines (forehead, eyes) to give you that aged look.

Clinique - Superbalanced Makeup (03 Ivory)

RRP $50

Brushes that I recommend for this product:
Real Techniques - Buffing Brush
RRP $45 (Purchased in a set of 4 - all of which will be featured in this post)

Real Techniques - Pointed Foundation Brush 

RRP $45 (Included in the set of 4 as per above)
To be used for detailing around the eyes, nose, and mouth


Bronzer 
One of the most important make-up products in my opinion; especially for days where you are not wearing foundation is the bronzer.

Recommended for when you have a tan (whether real/fake)
Model Co. Glow Summer Bronze
RRP $28

Perfect for every day, and gives a natural finish.

MAC Mineralise Skin Finish - Medium Plus
RRP $47


Brushes that I recommend for these products:
Sigma Beauty - F10 Powder/Blush
RRP $21
Real Techniques - Powder Brush
RRP $10 (This is the only RT brush that was not featured in the 4-pack collection)

 
Blush 
I always get so many compliments when using this blush! Don't let the look of it fool you, there is no shimmer to be seen when applying.

MAC Mineralise Blush - Dainty
RRP $43


For a cheaper alternative, and equally as good (bonus that it comes with a mirror, for those who travel), try this powder.


Model Co. Blush Cheek Powder - Amaretto Sunset
RRP $18
(Note: the packaging of this product has recently changed)


Brush that I recommend for these products:
Real Techniques - Contour Brush
RRP $45 (Included in the set of 4 mentioned under the 'Foundation' category)


Eyebrow 
Glides on, does not look too heavy, and will match the majority of peoples eye brow colour; use this pencil to fill in the gaps in your brow, and give definition in form of an arch. The perfect MUA trick!

MAC Cosmetics - Lingering
RRP $30


Brushes that I recommend for this products:
Sigma Beauty - E80 Brown and Lash (otherwise referred to as a 'Spoolie')
RRP $12

Use the Spoolie to even out the application, especially in areas where you have been a little heavy-handed.

Eyeshadows:
When it comes to eyeshadows, you cannot (and I mean canNOT) go past the highly pigmented, longlasting MAC cosmetics. Here are my top 6 eyeshadow colours to add to your palette.

Greys:

Electra (this is perfect for the inner corner of your eye)
Knight Divine

Browns:
Satin Taupe
Mystery


Darks:
Nehru
Carbon (this is good to use in conjunction with Nehru, as I do not find Carbon as black as I thought it would've been)


Each of these retail for $33. I have had mine for months, and I still cannot see the bottom of the pans, so definitely money well spent.


Brushes that i recommend for these products:For blending
Sigma Beauty - E40 Tapered Blending
RRP $14

For shading the eyelid
Sigma Beauty - E55 Eye Shading
RRP $12

For the crease/socket
Sigma Beauty - F70 Concealer
RRP $12
For the inner corner

Real Techniques - Detailer Brush
RRP $45 (The fourth brush Included in the set of 4)


If you choose to only buy 2 of these brushes - you will definitely need the blending brush, and the shading brush.

Highlighter 
Perfect for the tops of your cheek bones, and easy to use with finger application.


MAC Lustre Drops - Pink Rebel 
RRP $40


To highlight facial features, or to slim down (frequently referred to as a 'cheap nose job'), add this baby to your collection.

MAC Mineralise Skin Finish - Soft and Gentle
RRP $47


Brushes that i recommend for this product:

For cheekbones
Sigma F40 Angled brush
RRP $19
For nose area (sides and down the middle)
Sigma F60 Foundation brush
RRP $18


Contour
 

Celebs like Jennifer Stano (pictured below) have really brought the art of contouring to get that chiseled cheek bone look, to our attention. Use these products to get Jen's definition.


MAC Bronzing Powder - Matte Bronze
RRP $39


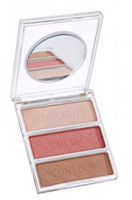
Ideal for travelers, or for those wanting to save a few bucks - this trio (highlight, blush and contour) is sure to interest you.

Napoleon Perdis - Ultimate Contour Palette
RRP $60


Brush that I recommend for these products:
Sigma Beauty - F35 Tapered Highlighter
$21


Lipgloss
I have this lipgloss in every one of my purses. I highly recommend you use this on top of a lipstick (whether it is a nude shade/pink), so that it does not show the imperfections in your lips. This has a decent staying power, and is not as tacky as other lipglosses I have tried. I have gone through quite a few bottles of these. Note: no lipbrushes are needed, just use the doe-foot applicator.

MAC Cremesheen Glass - Fashion Scoop

RRP $43

Lipstick
 

Forget spending big bucks on lipsticks, I have discovered these very long-lasting, easy to use, and full coverage beauties that can be purchased from any drugstore.


Don't want to go too dark and mature, this pinky/red lipstick will have you standing out of the crowd for all the right reasons. Oh and you can totally forget about getting this all over your teeth - these Revlon lipsticks are truly magical.

Revlon - 440 Cherries in the Snow
RRP $21.95

Another reason for not wanting to spend too much money on a lipstick, is that if the colour is only seasonal (just like our purple shades for 2013) there is no point spending lots of money on a product that you may only use a handful of times. Have fun with this not too dark, just right violet.

Revlon - 027 Violet Frenzy

RRP $21.95


Even cheaper, with a silky smooth application this Model Co. nude is a keeper.

Model Co. Party Proof Lipstick - Nearly Nude
$16.95


I definitely find these cheaper lipsticks to be more long-lasting, and have better staying power than any of the MAC lipsticks I own. Again, no lipbrushes required for these just use them straight from the dispenser.

Make-up remover
Throw away your face wipes, and say goodbye to any left over residue when removing your make-up. I have discovered, the world's most thorough make-up remover by Shu Uemura.
Gentle on the skin, perfect for all skin types, non-fragrant, and easy to use. This Ultim8 Cleansing oil retails for $56, and is available from David Jones.


Storage
For eyeshadows in particular (can be used for some blushes and bronzers - especially MAC), using a palette is a much more convenient way to store your products. It is perfect for travelling, is slim-line, and gives you more of a chance to use each shade.

Once you depot (Youtube have plenty of tutorials on how to depot your makeup), use the product sticker (so you know which shade your are using), on the magnet bottom of the pans. Once you have done this, you are ready to stick these into your palette.

Z-Palette
Large:

$20 (USD)


Small:
RRP $16


Introduced to us by Kim Kardashian, this jumbo storage will have your make-up station looking neater than ever. Storing all your makeup products (including your brushes!), you will never lose a piece of your make-up collection again. It is also a perfect way to remember what make-up you actually have, as each drawer is clear. As you will have this storage for forever, this is a great investment piece.


Make-up cube
RRP $199


You may be able to find a slightly cheaper version of the cube on Ebay.


Now, this brings me to my number one product, for my final day of the '12 days of Christmas'. If you only buy one product after reading this post, this is the one you NEED.
Number one goes to the MAC Paint Pots. If you haven't heard of a paint pot, it acts as a primer to the eye lids. It allows the eyeshadows to stick to the eyelid, with no movement whatsoever. And when I say no movement, I mean you could go to sleep, and wake up the next morning with your eye make-up still looking perfect (I have tested this for you, that's how I know...shh don't tell any MUA). Now there are many colours to choose from whether you use Tailor Grey under your Electra/Knight Divine, Groundwork under your Satin Taupe and Mystery, or Black Ground under your Nehru and Carbon - but the one colour you need is Painterly.
Unlike the other 3 paint pots that I have just mentioned Painterly is a neutral colour. You can use this under any eyeshadow, for a blank canvas. Although there are other neutral colours (such as Soft Ochre), it is definitely the Painterly that you need to add to your collection .
This universal colour not only intensifies the shadow colour, and prolongs the eye colour, it also stops your shadows from creasing. Retailing for $35, this paint pot is easy to use - either with the Sigma Beauty E55 brush (mentioned above), or with your finger.

This is one product that you cannot miss out on.

I hope this post saves you from wasting money on products that are just too hyped up about, but have no real value to your make-up collection. If you choose to buy any of these products, let me know your thoughts on them on Instagram @jspstyling

To everyone that reads my blog, subscribes, and checks out my Instagram, I wish you a very Merry Christmas and a fashionable New Year. I am looking forward to more styling to come with you in 2014!


JSP xx


Most images courtesy of Google

Thursday 19 December 2013

Get the look

Miranda Kerr was spotted yesterday in this tres chic outfit.


If you love this look, shop the items below:


Shoes: Senso
Sunglasses: Sportsgirl
Top: Sportsgirl
Jeans: Bardot
Trench: Burberry
Bag:
Celine

12 days of Christmas: Day 11

Who likes short-shorts? Day 9 is all about our favourite summer short varieties (it's all about the options!)

The top 6 short styles this Summer include:
-Leather
-Scalloped hemlines
-Lace
-Ripped denim cut-offs
-Pilgrim with embellishments; and
-Tuxedo

My favourite are the tuxedo shorts. I can wear them casually with a camisole, or dressed up with a shirt. I am also partial to anything leather! Leather is definitely back, and is here to stay this summer.

Less confident about showing your legs? Play with longer lengths - knee or 3/4, and add a little tan

Which style will you be wearing this summer?

12 days of Christmas: Day 10

Summer is all about getting your tan on! Well forget spending hours in the sun, because I have tried and tested the latest faux tans out there for you.

For those who think what is all the fuss about tans - a tan instantly makes you look a lot healthier (unless you choose a yellow based tan, and well in that case you could look like you have come down with a nasty case of jaundice), has a slimming effect, and makes you feel more confident in your clothes.

Say goodbye to your pale, Casper the Ghost days, as I help you find the right tan for you this summer.

Before we move onto the different types of tan, in order to have an optimal tan you must make sure you have a tanning routine.
So here's my pre-tan routine:
1 week before getting a tan, start exfoliating every day in the shower (making sure to concentrate on the areas the tan catches on the most - ankles, elbows and knees). Once you come out of the shower, moisturise your body. The day prior to having your spray tan, it is recommended that you shave your legs (shaving on the day leads to a tanning disaster...trust me on this one). On the day of the tan, do not moisturise yourself after the shower. Also, as hard as this is, do not use any deodorant, body spray or perfume on your body on the day of getting your tan (once you have your tan, that is when you can use deodorant).
When going for a spray tan, wear loose, dark clothing (too tight, and the tan will stick to your clothes, too light and the tan could stain your clothing). Ensure that all your hair is back, and no make-up or jewellery on. I would also recommend some really easy slip on shoes to wear for after your tan (anything strappy will leave marks on your feet), and that goes for bras - no bras after your tan.
Post-tan routine:

For a long lasting tan, use a moisturiser after every shower. I would also recommend using a tan extender.
Removing your tan:
Use an exfoliator and exfoliator glove whilst showering. Ensuring that you scrub every area of your body that has tan. This will remove your tan. It make take a few goes to get all the tan off, but the majority will be able to be removed during your initial exfoliation.
Tanning accessories
Exfoliator
Exfoliating glove
Moisturiser
Tan extender

Tanning glove (greatest invention of all time - forget the rubber gloves or the bare hands ladies!)


Gradual/buildable tan


The most hyped-up tan of 2013 - JBronze. I have categorised this under gradual/buildable as you will need well and truly more than a one-layer application to see a change of colour in your skin (so start tanning a few days before the event!). In the JBronze range, I would definitely stick to the cream rather than the spray; and I would also opt for the 'Dark' colour - if you can hardly see a colour change with one layer of dark, then there is no chance that the 'Medium' will make any difference. A good thing about this product is that you can easily see where you are applying the tan, to ensure there are no streaks. This product can be purchased from the JBronze online store, Priceline and most chemists, for $29.95.
Note: this tan is quite sticky (so best to use it at night), it has a shimmer finish, and has a very floral scent.


Wash-off tan
Ideal for ladies that have a function, and want to go to the office the next day not looking bronzed, this Model Co. tan lasts until you wash it off. Quick to put on, and even quicker to take off, this bottle of magic will cost you $28. With a caramel smell, and no stickyness you are ready to head out the door in no time. But beware, being caught in the rain, having any element of liquid spilt on you - will cause the tan to mark. Another tip, if you are wearing white, or leaning on a white tablecloth - just don't, this tan transfers very easily!

But, there can only be one tan on the top of my Christmas list this 12 days of Christmas, this tan is instant, smells like cocoa-butter, and will withstand the test of time...I'm talking about Model Co. Tan Airbush in a Can.


I have been using this baby for the past 7 years, and have never turned back. I like to do 2 layers of this tan (as I like a darker spray). The best thing about this product is that it dries fast, is not sticky, and if used with the tanning glove, will give you a streak-free tan.
This product can be purchased from the Model Co. website, or from Priceline and David Jones.
I would highly recommend that every girl looking for a perfect tan, give Model Co. a try! 

At first I was slightly offended that my friend bought me a fake-tan for my birthday - what was she trying to tell me?? But now I can't thank her enough for getting me onboard the Model Co. tan from such a young age.

Not only do Model. Co have amazing tanning products, they also have a great range of beauty products (that are tried and tested by me), but I'll save that for another post.

So rememeber, when you think tan, think Model Co. Let me know your thoughts on Instagram @jspstyling. And happy tanning!